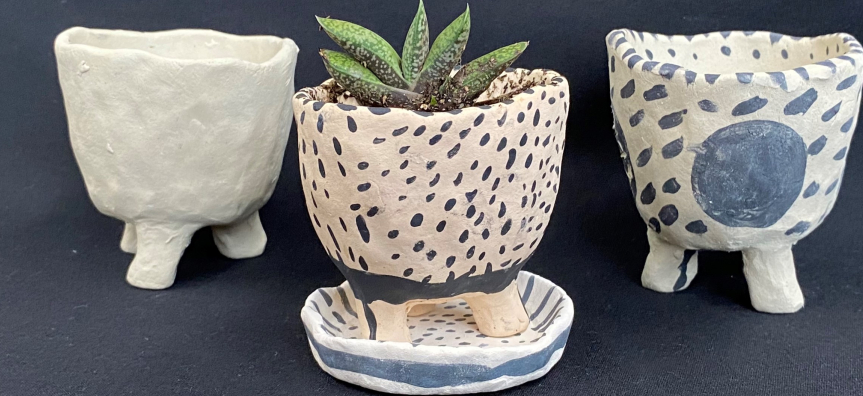
Get hands on and learn a new skill with the guidance of Helen Earl to create your own mini planter.
Helen Earl’s art practice combines ceramics with found, existent objects in response to investigations of place. Her uniquely poetic artworks result from personal observations and reflection supported by research of cultural, environmental and scientific research narratives. She holds an MVA from Sydney College of Arts and has taught widely and most recently at UTS, Sydney. You can find more of Helen's art @helenearlart.
Included in your kit:
- A web link to the tutorial video
- 250 grams of paper clay
- 1 x ‘Chux’ wipe cloth
- 1 x paddle pop stick
- 1 x homemade tool (paddle pop stick taped with large paper clip)
- 1 x size 2 round paint brush
- Small portion of black ceramic under glaze
- 2 x pieces of paper towel
- 1 x voucher for Brookvale Ceramic Studio to fire your planter
What you will need:
- A shallow container or bowl of water
- A piece of cardboard, old coaster or foam tray
- Wooden board, thick cardboard, chopping board or plastic
Method:
Preparation
- Wet ‘Chux’ cloth and tightly squeeze out the excess water and lay down on work area.
- Lightly moisten hands by dipping fingertips into the water container and spreading over palms.
- Shape and smooth clay into ball and then form into sausage shape.
- Using a paddle pop stick mark the clay into four roughly equal parts.
- Cut off one quarter from one end and put aside – this will be used to make the water dish.
- Now divide the next quarter in the middle and cut off this ‘eighth’. This small piece will be used to roll a coil that will be divided into 3 pieces for the planter legs.
- Reform the large piece of clay left over into a ball for the pot.
Making the planter
- Start with the smallest piece of clay. Squeeze into coil shape & roll across the whole work surface to form a nice even coil no more than 9 cm long and cut into three. Gently shape the legs so they are about the same length. Put aside.
- To start to make the pot gently and slowly pinch the clay between your thumb on the inside, and your fingers on the outside while slowly turning the ball of clay in your hand. Apply even pressure as you turn aiming to keep the clay an even thickness. Don’t try to thin out the pot completely whilst it is in your hand.
- Now put the pot onto the work surface and gently tap to make a flat base. At this point the pot is still quite thick and fat so it needs to be made taller and thinner by gently squeezing the walls of the pot inwards and upwards whilst turning the pot to keep the walls even. Take your time do not rush as this is when the clay can be pinched too thin. The whole pot needs to be the thickness of a thick pikelet not a pancake!
- Turn the pot upside down on its rim and mark out the placement of the legs. Crosshatch the two surfaces to be joined – the bottom of the pot and one end of each leg. Now dip a finger into the water and rub in the roughened clay until a slurry paste is formed on both surfaces.
- Gently press legs into place in a triangular configuration then use the paddle pop stick to smooth over the joins. This is important as you don’t want the legs to fall off.
- Use the paddle pop stick to make a drainage hole in the base of the pot between the legs. Turn over and smooth the clay around the hole.
- To form the dish for the planter use the last piece of clay, firstly shaping it into a ball then gently squeeze between your fingers until you have a circular shape that is larger than your pot diameter. Place the circle of clay on your work surface and turn up the edges to form sides. With a piece of paper towel underneath and resting on a piece of cardboard, smooth and press down inside to make sure your dish is flat.
- Let your dish and planter dry off so it is firm enough to pick up to start decorating. Depending on the weather this could take an hour or overnight.
Decorating
Firstly, with your paint, mark your full name on your pot and dish. This step is to identify your work when you drop it off to be fired.
Many variations of patterns can be made with dots, spots and dashes. Employing principles of design such as repetition, emphasis, radiation contrast and movement can really make simple elements into a great design.
You can simply paint black under glaze patterns onto your pot or you can experiment with the sgraffito technique (Italian word meaning “scratched”) by painting larger areas of solid black and then using the homemade tool to scratch back into the surface. The sgraffito technique works better when the pot is even firmer, what in pottery is described as ‘leather hard’ but not dry.
When you have completed your pot and the under glaze colour is dry enough so that it doesn’t smudge you can carefully place your pot into a small box and pack tissue or bubble wrap around it to transport the objects to the ceramics firing studio.
Enquiries: 8495 5028